Raspberry Pi - Minecraft - Auto Bridge
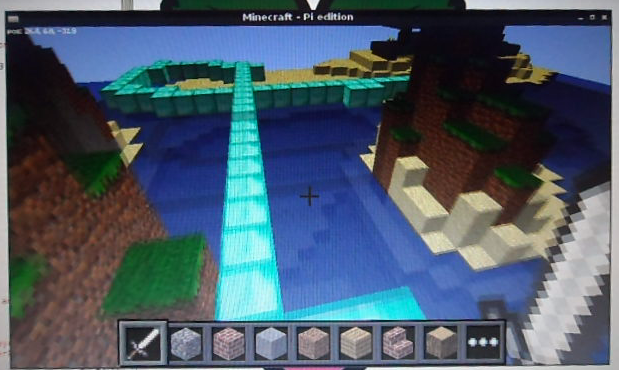
How about if you could wander around the Minecraft world and never fall off a cliff or have to swim across an ocean. What if, no matter where you walked a bridge automatically appeared under your feet… Well with Minecraft Pi edition, its API and a small python program, you can have just that!
The code is relatively simple, the program continually monitors the position of the player and by understanding where the player is and where they were, you can predict where they are going to be, if the block they are going to be standing on is empty (or AIR), fill it in!
This is based on the version 0.1.1 of Minecraft: Pi edition, see this post for info on how to install.
Download and run You can download the code direct from git-hub, so run minecraft, open/create a world and follow the instructions:
sudo apt-get install git-core
cd ~
git clone https://github.com/martinohanlon/minecraft-bridge.git
cd minecraft-bridge
python minecraft-bridge.py
The Code If you want to have a go yourself, here’s the code.
Create a directory for the program
mkdir ~/minecraft-bridge
Copy the python api class library from minecraft to the programs directory
cp -r ~/mcpi/api/python/mcpi ~/minecraft-bridge/minecraft
Create minecraft-bridge.py python program
nano ~/minecraft-bridge/minecraft-bridge.py
or open Idle and save minecraft-bridge.py to the minecraft-bridge directory
Code Be careful cutting and pasting direct from the web browser, its really easy to get odd characters in the code which will give you syntax errors.
#www.stuffaboutcode.com
#Raspberry Pi, Minecraft - auto bridge

#import the minecraft.py module from the minecraft directory
import minecraft.minecraft as minecraft
#import minecraft block module
import minecraft.block as block
#import time, so delays can be used
import time

#function to round players float position to integer position
def roundVec3(vec3):
    return minecraft.Vec3(int(vec3.x), int(vec3.y), int(vec3.z))

if __name__ == "__main__":

    time.sleep(2)

    #Connect to minecraft by creating the minecraft object
    # - minecraft needs to be running and in a game
    mc = minecraft.Minecraft.create()

    #Post a message to the minecraft chat window
    mc.postToChat("Hi, Minecraft - Auto Bridge Active")
    mc.postToChat("www.stuffaboutcode.com")

    #Get the players position
    lastPlayerPos = mc.player.getPos()

    while (True):

        #Get the players position
        playerPos = mc.player.getPos()

        #Find the difference between the player's position and the last position
        movementX = lastPlayerPos.x - playerPos.x
        movementZ = lastPlayerPos.z - playerPos.z

        #Has the player moved more than 0.2 in any horizontal (x,z) direction

        if ((movementX < -0.2) or (movementX > 0.2) or (movementZ < -0.2) or (movementZ > 0.2)):

            #Project players direction forward to the next square
            nextPlayerPos = playerPos
            # keep adding the movement to the players location till the next block is found
            while ((int(playerPos.x) == int(nextPlayerPos.x)) and (int(playerPos.z) == int(nextPlayerPos.z))):
                nextPlayerPos = minecraft.Vec3(nextPlayerPos.x - movementX, nextPlayerPos.y, nextPlayerPos.z - movementZ)

            #Is the block below the next player pos air, if so fill it in with DIAMOND
            blockBelowPos = roundVec3(nextPlayerPos)
            #to resolve issues with negative positions
            if blockBelowPos.z < 0: blockBelowPos.z = blockBelowPos.z - 1
            if blockBelowPos.x < 0: blockBelowPos.x = blockBelowPos.x - 1
            blockBelowPos.y = blockBelowPos.y - 1
            if mc.getBlock(blockBelowPos) == block.AIR:
                mc.setBlock(blockBelowPos.x, blockBelowPos.y, blockBelowPos.z, block.DIAMOND_BLOCK)

            #Store players last position
            lastPlayerPos = playerPos

        #Delay
        time.sleep(0.01)
The complete code repository is also on github, https://github.com/martinohanlon/minecraft-bridge.git
Run
Note - minecraft must be running and you must be in a game
python ~/minecraft-bridge/minecraft-bridge.py
or if using Idle, click Run Module