Showing posts with label games. Show all posts

Tuesday, 29 November 2016

Compile Allegro 5.x for Raspberry Pi

I am in the process of porting Mayhem 2 to Allegro 5 (with the help of Jonas Karlsson), and wanted to compile the latest version of Allegro on the Pi, as only an older version is available through apt.

Install the dependencies
sudo apt-get install build-essential git cmake cmake-curses-gui xorg-dev libgl1-mesa-dev libglu-dev libpng-dev libcurl4-nss-dev libfreetype6-dev libjpeg-dev libvorbis-dev libopenal-dev libphysfs-dev libgtk2.0-dev libpulse-dev libflac-dev libdumb1-dev
Get the Code
git clone https://github.com/liballeg/allegro5.git
cd allegro5
Check out the version you want - see here for a list of versions
git checkout 5.2.1
Build it
mkdir build
cd build
cmake .. -DCMAKE_TOOLCHAIN_FILE=../cmake/Toolchain-raspberrypi.cmake
make
Install it
sudo make install
export PKG_CONFIG_PATH=/home/pi/allegro5/build/lib/pkgconfig
sudo ldconfig

Friday, 17 June 2016

Mayhem 2 - an open source cave shooter

I recently ported an abandoned version the classic amiga game, Mayhem, to the Raspberry Pi - I did this exclusively so I could play the game with my friend, Lee, using RetroPie.

Since then myself and Lee, an artist for sumo digital, have been modding the game, adding new levels, features and controls - it now really is Mayhem 2.


Mayhem 2 is available for Windows and Raspberry Pi.

I'm hoping there will be lots more features and changes to the game over the coming months, if anyone has any idea's or would like to contribute it would be great to hear from you.

Gameplay

Mayhem 2 is a multiplayer (2 - 4) flight shooter with a really simple objective - destroy your opponents before they destroy you.

Your ship has limited fuel which will run down when you boost, if you run out you will be unable to control your ship, to refuel, land on any flat surface.

You can protect yourself from attack using your shields which will stop all bullets, be careful though your shields run down quickly and you wont be able to boost while your shields are on.

Power -ups are dropped (sometimes) when a player is destroyed (by either crashing or being shot) and when collected will give you a temporary boost such as a triple-shot weapon, better shields or more thrust.


New levels have been added including new ones with no edges, where you can seamlessly fly across the edge of the map.


Options

Levels 1-3 are the original game levels, all other levels are new to Mayhem 2.

DCA are anti spaceship guns which will fire at the player if they get too close.

Wall collision can be turned off for new players to get used to the controls and playing the game.

Controls

Mayhem 2 supports  joystick and keyboard control, joystick controls can be configured via the main menu.

Default joystick controls, assume an "xbox / ps like" joystick:

ControlAction
Stick 1Left / Right
Button 1 (A)Thrust
Button 2 (B)Shield
Button 6 (RB)Fire

If joysticks are connected, they are used as the players controls, if there are less than 4 joysticks connected, keys are used for the rest of the players in order:

KeyLeftRightShieldThrustFire
1zxcvg
2leftrightpad delpad 0pad enter
3bn,ml
4yuoi0

Install

For windows:

Download the zip file from https://github.com/martinohanlon/mayhem/archive/master.zip, open and copy mayhem-master to a folder.

Double click Mayhem2.exe in the mayhem-master folder.

Note - You maybe presented with message saying that the application was stopped from starting as it is unrecognised, click 'more info' and and choose 'run anyway'.

For Raspberry Pi:

Open a terminal and type:
sudo apt-get install liballegro4.4 liballegro4-dev
git clone https://github.com/martinohanlon/mayhem-pi
Run using:
cd mayhem-pi
./start
Code

The full source code is available on GitHub for Windows and Raspberry Pi.

Tuesday, 12 April 2016

Mayhem, Amiga game, ported to Raspberry Pi

Update - I've taken Mayhem forward to create Mayhem 2.

I had a Commodore Amiga and a game I played, a lot, was Mayhem, its a multiplayer (2-4) shooter - imagine multiplayer asteroids, with gravity, fuel and shields!

It was ported to the PC in 2002 by devpack who released the code in 2011 on github and google code which is where I picked it up and ported it to the Raspberry Pi.

This is the port, but check out the original Amiga game.

I got some help from the Raspberry Pi forums in getting it to compile then it was case of sorting out a few case sensitive filename bugs (it was original written for Windows!) and tracking down a bug in the original code which was causing a memory access error and segmentation fault.

The code is on github.com/martinohanlon/mayhem-pi.

Install
sudo apt-get install liballegro4.4 liballegro4-dev
git clone https://github.com/martinohanlon/mayhem-pi

Run
cd mayhem-pi
./start

Keys
Player 1 - z, x, c, v, g
Player 2 - left, right, pad del, pad 0, pad enter
Player 3 - b, n, 'comma', m, l
Player 4 - y, u, o, i, 0
Change level - 1, 2, 3

Compile
If you want to modify the game, I've got a couple of things on my list, you can recompile it with.
cd mayhem-pi
make


Sunday, 10 January 2016

Pocket PiGRRL - adding a mute

I recently made myself a Pocket PiGRRL based on Adafruit's tutorial - it really is a great machine and a brilliant learning experience.


There was one aspect though that I didn't like, the speaker hisses, not particularly loud and when your playing a game its not that noticeable but if you have got the volume down it is really annoying. Its all down the Raspberry Pi's noisy analogue audio out so there isn't a great deal you can do to clean it up.

My solution was to add the ability to shutdown the amp, effectively muting it when I didn't want any sound.

The PAM8302A amp breakout board has a shutdown (SD) pin which when a ground (logic zero) is connected it puts the amp into idle mode, muting the amp and reducing power consumption.


I soldered a piece of wire between GPIO 26 on the bottom of the A+ and the shutdown pin on the PAM8302A ampl.

Note - a few people have noted in the comments that on other models of PiGrrl (such as the Pi Grrl 2) GPIO 26 is already used and have suggested changing this to GPIO 7.


This gave me a way of triggering the shutdown pin next I needed some software and a way of running it.

Using this tutorial as the basis I added an 'Apps' tab to emulation station where I could run 2 scripts to mute and unmute the amp.

If you want to configure your Pocket PiGRRL to do the same, you can follow the instructions below.

Download and install wiring pi
The software uses wiringpi's gpio command line utility, so download and install it.

Configure emulation station
Copy the emulation station default settings file to the pi user's emulation station configuration:
cp /etc/emulationstation/es_systems.cfg ~/.emulationstation/
Add the 'apps' tab to the settings file:
nano ~/.emulationstation/es_systems.cfg
Scroll down to the bottom and add the following before the </systemList> text:
  <system>
    <fullname>Applications</fullname>
    <name>Apps</name>
    <path>~/RetroPie/roms/apps</path>
    <extension>.sh .SH .py .PY</extension>
    <command>%ROM%</command>
    <platform>apps</platform>
    <theme>esconfig</theme>
  </system>
Save and exit using Ctrl X.

Make a directory in roms to hold the scripts:
mkdir ~/RetroPie/roms/apps
Create a script to mute the amp by setting GPIO 26 to low (0):
nano ~/RetroPie/roms/apps/mute_amp.sh

gpio -g mode 26 out
gpio -g write 26 0
And an unmute script:
nano ~/RetroPie/roms/apps/unmute_amp.sh

gpio -g mode 26 out
gpio -g write 26 1
Make the scripts executable:
chmod +x ~/RetroPie/roms/apps/mute_amp.sh
chmod +x ~/RetroPie/roms/apps/unmute_amp.sh
You can now test the scripts by running them:
~/RetroPie/roms/apps/mute_amp.sh
~/RetroPie/roms/apps/unmute_amp.sh
Reboot and the Apps tab will appear in emulation station with 2 options to mute and unmute the amp.

I wanted the amp to be muted by default, so I added the script to be run at boot by editing /etc/rc.local:
sudo nano /etc/rc.local
Scroll down and add the unmute command under '/usr/local/bin/retrogame &' but before 'exit 0':
/home/pi/RetroPie/roms/apps/mute_amp.sh &

Tuesday, 22 September 2015

Minecraft Game Tutorial - LavaTrap - Pycon 2015

At Pycon UK 2015, I did a couple of workshop at its Education Track Kids day.

It was great fun and to make sure there was something fresh for the children to get their teeth into I came up with a new exercise called "LavaTrap" so I thought I would share it!

You can download the worksheet which is great printed as an A5 booklet on a single piece of A4 or you can follow the exercise below.

The Lava Trap

Using Python and Minecraft: Pi edition we can change the game to do amazing things.


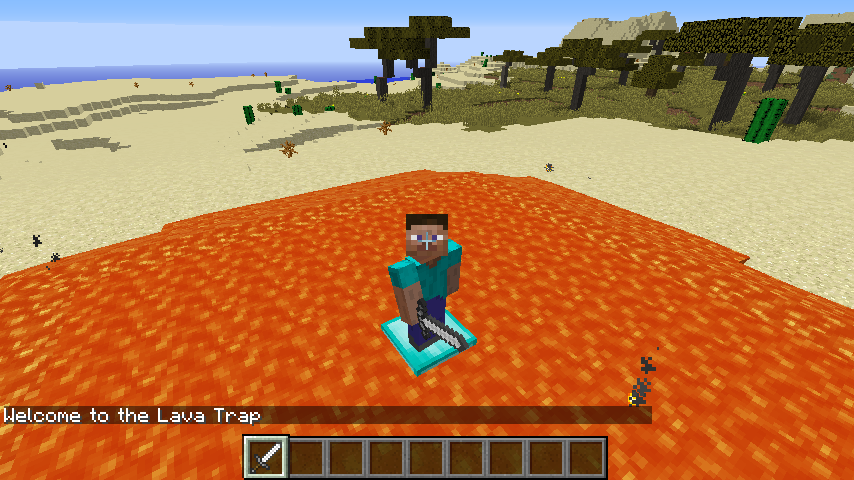
You are going to create mini game - a Lava Pit will instantly appear and Steve will be put at the centre of it, soon through the block he is standing on will disappear so he will have to move, but hang on all the blocks keep disappearing!


2015-09-13_22.22.00.png

Welcome

The first task is to start your program and get “Welcome to the Lava Trap” to appear on the screen:
  1. Press ESC to go back to the Minecraft menu but leave the game playing.
  2. Open Python IDLE by clicking Menu > Programming > Python 3.
  3. Use File > New Window to create a new program and save it as ‘myprogram.py’.
  4. Type the following code into the program to import the modules you will need.
from mcpi.minecraft import Minecraft
from mcpi import block

from time import sleep

  1. Create a connection to Minecraft using the code.

mc = Minecraft.create()

  1. Post a message to the chat window.

mc.postToChat("Welcome to the Lava Trap")

  1. Run your program by clicking Run > Run Module.


You should see your message appear in the Minecraft chat window.

Tips

  • An errors will be displayed in the Python Shell in red.
  • If you get an error check your code carefully.
  • Capital letters are important Minecraft is different to minecraft.

Lava

Next you will use the api to create the pit where the game will be played - when your program runs it will instantly appear under Steve before the game starts.


First update your program so it creates a single block of lava under Steve, by adding the following code:
  1. Put a 3 second delay into your program so that you can see what going on.

sleep(3)

  1. Find out where Steve is in the world.

pos = mc.player.getTilePos()

  1. Create a block of lava under Steve.

mc.setBlock(pos.x, pos.y - 1, pos.z, block.LAVA.id)

  1. Run your program by clicking Run > Run Module or by pressing F5.


Your program will wait 3 seconds and then a block of Lava will appear under Steve - he’s going fall in and burn!

Tips

  • Walk somewhere different and run the program again - another Lava block will appear.
  • Try changing the code to use DIAMOND_BLOCK rather than LAVA and see what happens.
You need to create a lot more lava in order for the game to be a lot more fun - next you will program a large slab of STONE with LAVA on the top:
  1. Use setBlocks() to create an area of STONE 2 blocks below Steve for the LAVA to sit on.

mc.setBlocks(pos.x - 5, pos.y - 2, pos.z - 5,

            pos.x + 5, pos.y - 2, pos.z + 5,

            block.STONE.id)

  1. Then create the LAVA under Steve.

mc.setBlocks(pos.x - 5, pos.y - 1, pos.z - 5,

            pos.x + 5, pos.y - 1, pos.z + 5,

            block.LAVA.id)

  1. Run your program to see the Lava ‘pit’.


Make a DIAMOND_BLOCK platform in the middle for Steve to stand on:
  1. Create the diamond block.

mc.setBlock(pos.x, pos.y - 1, pos.z, block.DIAMOND_BLOCK.id)

  1. Run your program Steve will be stuck in the middle of the Lava pit.

Challenge 1 - Can you code yourself out of the Lava Pit?

At the moment unless Steve flies or lays blocks down he can’t get out without getting burned - update your program so he can get out.

Tips

  • Use more setBlocks() commands to make a bridge out of the Lava pit.
  • You can change Steve’s x,y,z position using mc.player.setTilePos(x, y, z).
  • If it’s too easy, make the Lava Pit really big - is it still easy?

Make a game

Update your program to make blocks under Steve disappear:
  1. Post messages to the chat screen to warn the player the game is about to start.

mc.postToChat("Get Ready")

mc.postToChat("Blocks under you will keep disappearing")

sleep(3)

mc.postToChat("Go")

  1. Create a variable called gameover and set it to False - it will be set to True at the end of the game.

gameover = False

  1. Create a loop which will continue until the game is over.

while gameover == False:

  1. Get Steve’s position.

   playpos = mc.player.getTilePos()

  1. Turn the block under Steve to OBSIDIAN as a warning and wait for 2 seconds.

   mc.setBlock(playpos.x, playpos.y - 1, playpos.z,block.OBSIDIAN.id)

   sleep(2)

  1. After the warning turn the block to AIR, if Steve is standing on it, he’s going to be in the Lava pit.

   mc.setBlock(playpos.x, playpos.y - 1, playpos.z, block.AIR.id)

   sleep(0.5)

  1. Run the program, the game will start and you will have to put blocks down in the Lava pit to escape because otherwise they are going to disappear and Steve will fall in.

Game over

The game is over if Steve falls into the Lava, you need to modify your program to check if he has fallen into the Lava and put a message on the screen:
  1. Use an if statement to see if Steve’s height (y) is not equal to where he started, if it is set the gameover variable to True.

   if playpos.y != pos.y:

       gameover = True

  1. Put a message on the screen to let the player know they have been caught in the lava trap.

       mc.postToChat("Game over.")

  1. Run your program and see how long you can stay out of the lava.

Challenge 2 - Make the game your own.

This game is just the start, can you finish it? Here are some challenges:
  1. Make the game harder?
  2. Make a better game arena, perhaps build a stadium or walls around it so Steve can get out.
  3. Add points to the game, each time Steve doesn’t fall in he gets a point.
  4. Change the game so it starts easy but gets harder the longer you play.
  5. Add a 2 player (or even multiplayer!) option.

Tips

  • If you make the sleeps shorter it’ll make the game quicker and harder.
  • Create a variable called points at the start of the game and add 1 to it each time your program goes around the loop.
  • There are lots of experienced Python developers all around you - perhaps you can teach them!

Find out more

If you have enjoyed this check out “Adventures in Minecraft” and learn how to program Minecraft using Python on your Raspberry Pi, Windows PC or Apple Mac and the Minecraft resources on the Raspberry Pi website www.raspberrypi.org/resources.

Sunday, 6 September 2015

Pygame Zero - Pong

I wanted to explore Pygame Zero so I gave myself a challenge of creating a version of Pong.


My first piece of learning from the experience just reconfirms something I already knew - games development is hard!  Pygame Zero takes some of the pain and is certainly a lot easier to get started with than Pygame, but there is still a lot of work to do for game like Pong.

The second thing I learnt is that I didn't know how Pong worked! This page which describes how the balls reacts when it hits a paddle is really useful.

You will find all the code on github https://github.com/martinohanlon/pgzero-pong.

You control the paddles with Q A (player 1) and K M (player 2).

Its very much unfinished and is missing features like:
  • Time limit - the game continues forever
  • Scores - the score should be displayed on the screen
  • 1 player mode - artificial intelligent 2nd player
Does anyone fancy picking it up?

Code
from math import sin, cos, radians
from time import sleep

#setup the constants
WIDTH = 500
HEIGHT = 300
BALLSPEED = 10
PADDLESPEED = 5
MAXBOUNCEANGLE = 75

def reset_game(angle):

    #setup ball properties
    ball.pos = WIDTH / 2, HEIGHT / 2
    ball.x_float = float(ball.x)
    ball.y_float = float(ball.y)
    ball.angle = angle
    ball.x_vel = BALLSPEED * cos(radians(ball.angle))
    ball.y_vel = BALLSPEED * sin(radians(ball.angle))

    #position the paddles
    pad1.pos = 10, HEIGHT / 2
    pad2.pos = WIDTH - 10, HEIGHT / 2

#create a rectangle of the playing area
screenRect = Rect(10,0,WIDTH - 10,HEIGHT)

#create ball
ball = Actor('ball')

#create paddles
pad1 = Actor('paddle')
pad2 = Actor('paddle')

#reset the game
reset_game(180)

#setup the goals
goals = [0, 0]

def draw():
    screen.clear()
    ball.draw()
    pad1.draw()
    pad2.draw()

def update():

    #move the paddles
    if keyboard.q:
        pad1.top -= PADDLESPEED
    if keyboard.a:
        pad1.top += PADDLESPEED
    if keyboard.k:
        pad2.top -= PADDLESPEED
    if keyboard.m:
        pad2.top += PADDLESPEED

    #move the ball
    ball_old_x = ball.x_float
    ball_old_y = ball.y_float
    
    ball.x_float = ball.x_float + ball.x_vel
    ball.y_float = ball.y_float + ball.y_vel
    ball.x = int(round(ball.x_float))
    ball.y = int(round(ball.y_float))

    #move the ball back to where it was?
    reset_ball = False

    #has the ball left the screen?  
    if not screenRect.contains(ball):
        
        #did it hit the top or bottom?
        if ball.top < 0 or ball.bottom > HEIGHT:
            ball.y_vel *= -1
            reset_ball = True
            
        #it must have hit the side
        else:
            if ball.left < 10:
                print("Player 2 goal")
                goals[1] += 1
                reset_game(180)
                sleep(2)
                print("Score {} : {}".format(goals[0], goals[1]))

            elif ball.right > WIDTH - 10:
                print("player 1 goal")
                goals[1] += 1
                reset_game(0)
                sleep(2)
                print("Score {} : {}".format(goals[0], goals[1]))
    
    #has the ball hit a paddle
    if pad1.colliderect(ball):
        #work out the bounce angle
        bounce_angle = ((ball.y - pad1.y) / (pad1.height / 2)) * MAXBOUNCEANGLE
        ball.angle = max(0 - MAXBOUNCEANGLE, min(MAXBOUNCEANGLE, bounce_angle))
        #work out the ball velocity
        ball.x_vel = BALLSPEED * cos(radians(ball.angle))
        ball.y_vel = BALLSPEED * sin(radians(ball.angle))

        reset_ball = True

    elif pad2.colliderect(ball):
        bounce_angle = 180 - (((ball.y - pad2.y) / (pad2.height / 2)) * MAXBOUNCEANGLE)
        ball.angle = max(180 - MAXBOUNCEANGLE, min(180 + MAXBOUNCEANGLE, bounce_angle))
        ball.x_vel = BALLSPEED * cos(radians(ball.angle))
        ball.y_vel = BALLSPEED * sin(radians(ball.angle))

        reset_ball = True

    if reset_ball:
        ball.x_float = ball_old_x
        ball.y_float = ball_old_y
        ball.x = int(round(ball.x_float))
        ball.y = int(round(ball.y_float))

Sunday, 21 June 2015

Astro Pi Snake Game

I recently made Snake for the Astro Pi, just for fun really, but I am putting it online as I would like to see what others can do with it - it is literally screaming out to be hacked and improved.

I've given some ideas and tips but there is much more than could be done.

Anyone budding coders up for the challenge?


I started with the code I originally wrote for Minecraft - Snake and made the changes so that rather than creating blocks in Minecraft it turned on leds and used the joystick to control the motion. I was also surprised by how much I improved the overall structure of the code, it wasn't poorly coded it was just a bit untidy.

To try it yourself, get the code from github.com/martinohanlon/AstroPiSnake and run it, by opening a terminal and using the commands:
git clone https://github.com/martinohanlon/AstroPiSnake
cd AstroPiSnake
sudo python astropisnake.py
What else could you do? How would you improve it? Can you improve it?

These are some of the ideas I thought of:
  1. Introduce levels, the better the player does, the faster the snake should go. The speed of the snake is set by the sleep in the startGame() method.
  2. The original game had more than one apple. The apple property would have to be changed to a list and the move() method would have to check if one of many apples had been eaten.
  3. Power ups - special apples which appear for a short amount of time and if you eat them you can go across the screen i.e. exiting the screen on the left would make you appear on the right.
Let me know how you get on - perhaps they'll be a prize!


Thursday, 18 December 2014

GPIO Xmas Tree Reaction Game

In order to bring a bit of Christmas based fun to the office (I am normally a bit of a 'bah humbug') I have created a reaction game using a Raspberry Pi and a GPIO Xmas Tree from pocketmoneytronics.


The game is pretty simple, random leds are lit up on the xmas tree, the player has to press the button when the green led on the top of the tree is lit up.  The quicker you are, the higher you score.

A random animation is played when the tree is waiting for the next player, you press the button to start, all the leds are lit up and then its time to play.  At the end the players position is displayed on the tree, with 1st place lighting up the top of the tree.

Have a go
You will need a Raspberry Pi, a GPIO Xmas Tree and a button:
  1. Plug the GPIO Xmas tree into the far left set of pins on the GPIO header
  2. Connect the button up between 3.3V and GPIO 4.

Update - 23/12/2014 - 2 player
The GPIO Xmas Tree Reaction game has gone 2 player...  You go head to head versus a friend, the quickest to the green led wins and an led on either the left or right of the tree is lit up to show you who won.


If you want to play head to head:
  1. Connect the button up between 3.3V and GPIO22
  2. Press the 2nd button to start the 2 player game, pressing the 1st button, still starts the 1 player game
Get the code
Download the code from github.com/martinohanlon/GPIOXmasTreeGame and run the game - open a terminal and run:
git clone https://github.com/martinohanlon/GPIOXmasTreeGame
cd GPIOXmasTreeGame/xmastreegame
python xmastreegame.py

How does it work
There was only 1 particular challenge to creating the game (other than my dodgy soldering which meant I ruined the first tree I brought)  - doing more than one thing at a time!

The libraries supplied by pocketmoneytronics are really good and there are some great examples, the problem I had is that when you tell the tree to "light up leds 1 & 4", that is all your program can do, it blocks because the tree uses Charlieplexing and the libraries don't support threading.

Charliewhat?  In summary, each gpio pin is actually controlling 2 leds and when you light up 2 leds on the tree the program is actually turning the leds on and off independently really quickly, so quickly that its tricking your eyes into thinking that both leds are actually turned on.

This is why you cant just "turn on led 1 and led 4", the tree doesn't work that way.

To get around this, I made a threaded version of the pocketmoneytronics tree.py module.

Using the original libraries, you would have used the following code to light up all the leds for 1 second:
tree.setup()
#turn all the leds on for 1 second
#the program stops here and nothing can happen until the leds turns off
tree.leds_on_and_wait(ALL, 1)
tree.cleanup()
Using my threaded class you would use:
#create the XmasTree object
tree = XmasTree()
#start the tree object
tree.start()
#turn all leds on
tree.leds_on(ALL)
#the program can now do what it wants and the leds will stay on
sleep(1)
tree.stop()
The rest of the program was pretty easy to create, wait for a button to be pressed, light up led's randomly with a random delay in between, get the difference in time between turning on the yellow led and the button being pressed and hey presto, a Christmas themed game.

The code
All the code is here github.com/martinohanlon/GPIOXmasTreeGame.
import threading
import RPi.GPIO as GPIO
from time import sleep, time
from ThreadedTree import XmasTree
from random import getrandbits, randint
from os.path import isfile

#CONSTANTS
#leds
L0 = 1
L1 = 2
L2 = 4
L3 = 8
L4 = 16
L5 = 32
L6 = 64
ALL = 1+2+4+8+16+32+64
#leds as a list
LEDS = [L0,L1,L2,L3,L4,L5,L6]
#leds as a list descending down the tree
LEDSDESC = [L0,L6,L5,L4,L2,L1,L3]
#gpio pin the game button is connected too
NEWGAMEBUTTONPIN = 4
#gpio pin which will cause the game to stop if trigger
STOPGAMEBUTTONPIN = 17

class TreeRandom(threading.Thread):
    def __init__(self, xmasTree):
        #setup threading
        threading.Thread.__init__(self)
        #setup properties
        self.stopped = False
        self.running = False
        self.xmasTree = xmasTree
        
    def run(self):
        self.running = True
        while not self.stopped:
            ledsToLight = 0
            #loop through all the lights, randomly pick which ones to light
            for led in LEDS:
                if getrandbits(1) == 1:
                    ledsToLight = ledsToLight + led
            #turn the leds on
            self.xmasTree.leds_on(ledsToLight)
            #delay
            sleep(1)
        #when its stopped turn the leds off
        self.xmasTree.leds_on(0)
        self.running = False

    def stop(self):
        #stop the animation
        self.stopped = True
        #wait for it to stop running
        while self.running:
            sleep(0.01)

class TreeGame():
    def __init__(self, xmasTree, scoresFile):
        self.scoresFile = scoresFile
        self.scores = self._loadScores()
        #print self.scores

    def play(self):
        #turn on all leds
        xmasTree.leds_on(ALL)
        #wait a bit
        sleep(2)
        #get a random number, which will be how many leds will be lit before the green one
        steps = randint(7,14)
        for step in range(0,steps):
            #light a random red led
            ledToLight = LEDS[randint(1,6)]
            xmasTree.leds_on(ledToLight)
            #wait for a random time between 0.5 and 1 second
            timeToSleep = randint(5,10) / 10.0
            sleep(timeToSleep)
        #light the green led
        xmasTree.leds_on(L0)
        #get the time
        startTime = time()
        #wait for button to be released (if its pressed)
        while(GPIO.input(NEWGAMEBUTTONPIN) == 1):
            sleep(0.001)
        #wait for the button to be pressed
        while(GPIO.input(NEWGAMEBUTTONPIN) == 0):
            sleep(0.001)
        #get the time
        endTime = time()
        timeDiff = endTime - startTime
        #put the score in the score list and find the position
        # loop through all the scores
        for score in range(0,len(self.scores)):
            # is this time less than the current score?
            if timeDiff < self.scores[score]:
                #record the players position
                position = score
                self.scores.insert(score,timeDiff)
                break
        #save to the score file
        self._saveScores()
        #flash the position
        self._displayPosition(position)

    def _displayPosition(self,position):
        #if there position was less than 6, flash it on the tree
        # else flash all the lights
        if position <= 6:
            ledToLight = LEDSDESC[position]
        else:
            ledToLight = ALL
        #flash the position
        for count in range(15):
            xmasTree.leds_on(ledToLight)
            sleep(0.2)
            xmasTree.leds_on(0)
            sleep(0.2)

    # load the scores files
    def _loadScores(self):
        scores = []
        #does the file exist?  If so open it
        if isfile(self.scoresFile):
            with open(self.scoresFile, "r") as file:
                for score in file:
                    scores.append(float(score))
        else:
            #no file so put an initial score which is massive
            scores.append(999)

        return scores

    # save the scores file
    def _saveScores(self):
        with open(self.scoresFile, "w") as file:
            for score in self.scores:
                file.write(str(score)+"\n")


#main program
if __name__ == "__main__":

    #setup GPIO
    GPIO.setmode(GPIO.BCM)

    #setup the new game button
    GPIO.setup(NEWGAMEBUTTONPIN, GPIO.IN, pull_up_down=GPIO.PUD_DOWN)
    #setup the stop game button
    GPIO.setup(STOPGAMEBUTTONPIN, GPIO.IN, pull_up_down=GPIO.PUD_DOWN)

    #create threaded tree object
    xmasTree = XmasTree()
    #start the xmas tree
    xmasTree.start()
    #create tree game oject
    treeGame = TreeGame(xmasTree, "scores.txt")

    try:
        stopGame = False
        #loop until the stop game pin is set
        while(not stopGame):
            #run the xmas tree random animation
            treeRandom = TreeRandom(xmasTree)
            treeRandom.start()
            
            #wait until a button is pressed to either start a new game or stop the game
            while(GPIO.input(NEWGAMEBUTTONPIN) == 0 and GPIO.input(STOPGAMEBUTTONPIN) == 0):
                sleep(0.01)
            
            #new game
            if GPIO.input(NEWGAMEBUTTONPIN) == 1:                
                #stop the animation
                treeRandom.stop()
                #run the game
                treeGame.play()
                #game over, start the animation again
                sleep(1)

            #stop game
            elif GPIO.input(STOPGAMEBUTTONPIN) == 1:
                stopGame = True
        
    finally:
        #stop tree random animation
        treeRandom.stop()
        #stop xmas tree
        xmasTree.stop()
        #cleanup gpio
        GPIO.cleanup()


Saturday, 19 July 2014

Minecraft Fractal Trees

I have been experimenting with the Minecraft Graphics Turtle I created, its a typical graphics turtle in that you issue it commands such as forward, backward, left, right but you can also tell it to go up and down and go 3d!

I wanted to create something that took advantage of the 3d world available in Minecraft and decided to see if I could make some 3d fractals.  Fractals are repeating patterns which when observed at different scales appear the same - I know that sounds like rubbish, but that's what they are!

These are the 3d fractal tree's I created in Minecraft:


This is what a 2d fractal tree looks like:

I found some python turtle code to create the 2d tree at interactivepython.org/runestone/static/pythonds/Recursion/graphical.html:
import turtle

def tree(branchLen,t):
    if branchLen > 5:
        t.forward(branchLen)
        t.right(20)
        tree(branchLen-15,t)
        t.left(40)
        tree(branchLen-15,t)
        t.right(20)
        t.backward(branchLen)

def main():
    t = turtle.Turtle()
    myWin = turtle.Screen()
    t.left(90)
    t.up()
    t.backward(100)
    t.down()
    t.color("green")
    tree(75,t)
    myWin.exitonclick()

main()

Its recursive, which means that a function calls itself, so in the example above the tree() function calls itself passing a smaller and smaller branch until the branch gets smaller than 5 and the function doesn't call itself any more and exits.  Recursion is the basis of all fractals, its how you get the repeating patterns.

I modded this code to use my Minecraft Graphics Turtle and rather than create 2 branches each time the function is called it creates 4 branches - 2 facing north to south and 2 facing east to west.

#Minecraft Turtle Example
import minecraftturtle
import minecraft
import block

def tree(branchLen,t):
    if branchLen > 6:
        if branchLen > 10:
            t.penblock(block.WOOD)
        else:
            t.penblock(block.LEAVES)

        #for performance
        x,y,z = t.position.x, t.position.y, t.position.z
        #draw branch
        t.forward(branchLen)
        
        t.up(20)
        tree(branchLen-2, t)
        
        t.right(90)
        tree(branchLen-2, t)

        t.left(180)
        tree(branchLen-2, t)

        t.down(40)
        t.right(90)
        tree(branchLen-2, t)

        t.up(20)
        
        #go back
        #t.backward(branchLen)
        #for performance - rather than going back over every line
        t.setposition(x, y, z)

#create connection to minecraft
mc = minecraft.Minecraft.create()

#get players position
pos = mc.player.getPos()

#create minecraft turtle
steve = minecraftturtle.MinecraftTurtle(mc, pos)

#point up
steve.setverticalheading(90)

#set speed
steve.speed(0)

#call the tree fractal
tree(20, steve)

The other change I made was to change the block type so that the shorter branches (the ones at the top) are made of leaves and the ones at the bottom are made of wood.

I created these on the full version of Minecraft using Bukkit and Raspberry Juice, so I could take hi-def pictures but the same code works on the raspberry pi.

If you want to have a go, download the minecraft turtle code from github.com/martinohanlon/minecraft-turtle and run the example_3dfractaltree.py program:

sudo apt-get install git-core
cd ~
git clone https://github.com/martinohanlon/minecraft-turtle.git
cd ~/minecraft-turtle
python example_3dfractaltree.py

I also made a fractal tree made out of random colours, check out example_3dfractaltree_colors.py.